This article shows how to use the SSD1306 0.96 inch I2C OLED display with the Arduino. We’ll show you some features of the OLED display, how to connect it to the Arduino board, and how to write text, draw shapes and display bitmap images. Lastly, we’ll build a project example that displays temperature and humidity readings.

Introducing The 0.96 Inch OLED Display
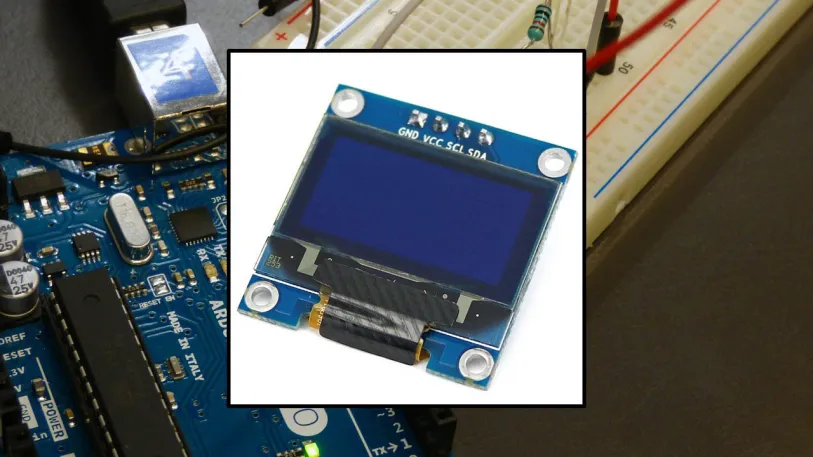
The organic light-emitting diode (OLED) display that we’ll use in this tutorial is the SSD1306 model: a monocolor, 0.96-inch display with 128×64 pixels as shown in the following figure.

The OLED display doesn’t require backlight, which results in a very nice contrast in dark environments. Additionally, its pixels consume energy only when they are on, so the OLED display consumes less power when compared with other displays.
The model we’re using here has only four pins and communicates with the Arduino using I2C communication protocol. There are models that come with an extra RESET pin. There are also other OLED displays that communicate using SPI communication.
Pin Wiring
Because the OLED display uses I2C communication protocol, wiring is very simple. You just need to connect to the Arduino Uno I2C pins as shown in the table below.
| Pin | Wiring To Arduino Uno |
| Vin | 5V |
| GND | GND |
| SCL | A5 |
| SDA | A4 |
If you’re using a different Arduino board, make sure you check the correct I2C pins:
- Nano: SDA (A4); SCL (A5);
- MEGA: SDA (20); SCL (21);
- Leonardo: SDA (20); SCL (21);

Libraries
To control the OLED display you need the Adafruit_SSD1306.H and the Adafruit_GFX.H libraries. Follow the next instructions to install those libraries.
1. Open your Arduino IDE and go to Sketch > Include Library > Manage Libraries. The Library Manager should open.
2. Type “SSD1306” in the search box and install the SSD1306 library from Adafruit.

3. After installing the SSD1306 library from Adafruit, type “GFX” in the search box and install the library.

4. After installing the libraries, restart your Arduino IDE.
Tips For Writing Text Using These Libraries
Here’s some functions that will help you handle the OLED display library to write text or draw simple graphics.
- display.clearDisplay() – all pixels are off
- display.drawPixel(x,y, color) – plot a pixel in the x,y coordinates
- display.setTextSize(n) – set the font size, supports sizes from 1 to 8
- display.setCursor(x,y) – set the coordinates to start writing text
- display.print(“message”) – print the characters at location x,y
- display.display() – call this method for the changes to make effect
Testing The OLED Display
After wiring the OLED display to the Arduino and installing all required libraries, you can use one example from the library to see if everything is working properly.
In your Arduino IDE, go to File > Examples > Adafruit SSD1306 and select the example for the display you’re using.

The following code should load:
/*********
  Complete project details at https://randomnerdtutorials.com

  This is an example for our Monochrome OLEDs based on SSD1306 drivers. Pick one up today in the adafruit shop! ------> http://www.adafruit.com/category/63_98
  This example is for a 128x32 pixel display using I2C to communicate 3 pins are required to interface (two I2C and one reset).
  Adafruit invests time and resources providing this open source code, please support Adafruit and open-source hardware by purchasing products from Adafruit!
  Written by Limor Fried/Ladyada for Adafruit Industries, with contributions from the open source community. BSD license, check license.txt for more information All text above, and the splash screen below must be included in any redistribution.
*********/

#include <SPI.h>
#include <Wire.h>
#include <Adafruit_GFX.h>
#include <Adafruit_SSD1306.h>

#define SCREEN_WIDTH 128 // OLED display width, in pixels
#define SCREEN_HEIGHT 64 // OLED display height, in pixels

// Declaration for an SSD1306 display connected to I2C (SDA, SCL pins)
#define OLED_RESET     -1 // Reset pin # (or -1 if sharing Arduino reset pin)
Adafruit_SSD1306 display(SCREEN_WIDTH, SCREEN_HEIGHT, &Wire, OLED_RESET);

#define NUMFLAKES     10 // Number of snowflakes in the animation example

#define LOGO_HEIGHT   16
#define LOGO_WIDTH    16
static const unsigned char PROGMEM logo_bmp[] =
{ B00000000, B11000000,
  B00000001, B11000000,
  B00000001, B11000000,
  B00000011, B11100000,
  B11110011, B11100000,
  B11111110, B11111000,
  B01111110, B11111111,
  B00110011, B10011111,
  B00011111, B11111100,
  B00001101, B01110000,
  B00011011, B10100000,
  B00111111, B11100000,
  B00111111, B11110000,
  B01111100, B11110000,
  B01110000, B01110000,
  B00000000, B00110000 };

void setup() {
  Serial.begin(115200);

  // SSD1306_SWITCHCAPVCC = generate display voltage from 3.3V internally
  if(!display.begin(SSD1306_SWITCHCAPVCC, 0x3C)) {
    Serial.println(F("SSD1306 allocation failed"));
    for(;;); // Don't proceed, loop forever
  }

  // Show initial display buffer contents on the screen --
  // the library initializes this with an Adafruit splash screen.
  display.display();
  delay(2000); // Pause for 2 seconds

  // Clear the buffer
  display.clearDisplay();

  // Draw a single pixel in white
  display.drawPixel(10, 10, WHITE);

  // Show the display buffer on the screen. You MUST call display() after
  // drawing commands to make them visible on screen!
  display.display();
  delay(2000);
  // display.display() is NOT necessary after every single drawing command,
  // unless that's what you want...rather, you can batch up a bunch of
  // drawing operations and then update the screen all at once by calling
  // display.display(). These examples demonstrate both approaches...

  testdrawline();      // Draw many lines

  testdrawrect();      // Draw rectangles (outlines)

  testfillrect();      // Draw rectangles (filled)

  testdrawcircle();    // Draw circles (outlines)

  testfillcircle();    // Draw circles (filled)

  testdrawroundrect(); // Draw rounded rectangles (outlines)

  testfillroundrect(); // Draw rounded rectangles (filled)

  testdrawtriangle();  // Draw triangles (outlines)

  testfilltriangle();  // Draw triangles (filled)

  testdrawchar();      // Draw characters of the default font

  testdrawstyles();    // Draw 'stylized' characters

  testscrolltext();    // Draw scrolling text

  testdrawbitmap();    // Draw a small bitmap image

  // Invert and restore display, pausing in-between
  display.invertDisplay(true);
  delay(1000);
  display.invertDisplay(false);
  delay(1000);

  testanimate(logo_bmp, LOGO_WIDTH, LOGO_HEIGHT); // Animate bitmaps
}

void loop() {
}

void testdrawline() {
  int16_t i;

  display.clearDisplay(); // Clear display buffer

  for(i=0; i<display.width(); i+=4) {
    display.drawLine(0, 0, i, display.height()-1, WHITE);
    display.display(); // Update screen with each newly-drawn line
    delay(1);
  }
  for(i=0; i<display.height(); i+=4) {
    display.drawLine(0, 0, display.width()-1, i, WHITE);
    display.display();
    delay(1);
  }
  delay(250);

  display.clearDisplay();

  for(i=0; i<display.width(); i+=4) {
    display.drawLine(0, display.height()-1, i, 0, WHITE);
    display.display();
    delay(1);
  }
  for(i=display.height()-1; i>=0; i-=4) {
    display.drawLine(0, display.height()-1, display.width()-1, i, WHITE);
    display.display();
    delay(1);
  }
  delay(250);

  display.clearDisplay();

  for(i=display.width()-1; i>=0; i-=4) {
    display.drawLine(display.width()-1, display.height()-1, i, 0, WHITE);
    display.display();
    delay(1);
  }
  for(i=display.height()-1; i>=0; i-=4) {
    display.drawLine(display.width()-1, display.height()-1, 0, i, WHITE);
    display.display();
    delay(1);
  }
  delay(250);

  display.clearDisplay();

  for(i=0; i<display.height(); i+=4) {
    display.drawLine(display.width()-1, 0, 0, i, WHITE);
    display.display();
    delay(1);
  }
  for(i=0; i<display.width(); i+=4) {
    display.drawLine(display.width()-1, 0, i, display.height()-1, WHITE);
    display.display();
    delay(1);
  }

  delay(2000); // Pause for 2 seconds
}

void testdrawrect(void) {
  display.clearDisplay();

  for(int16_t i=0; i<display.height()/2; i+=2) {
    display.drawRect(i, i, display.width()-2*i, display.height()-2*i, WHITE);
    display.display(); // Update screen with each newly-drawn rectangle
    delay(1);
  }

  delay(2000);
}

void testfillrect(void) {
  display.clearDisplay();

  for(int16_t i=0; i<display.height()/2; i+=3) {
    // The INVERSE color is used so rectangles alternate white/black
    display.fillRect(i, i, display.width()-i*2, display.height()-i*2, INVERSE);
    display.display(); // Update screen with each newly-drawn rectangle
    delay(1);
  }

  delay(2000);
}

void testdrawcircle(void) {
  display.clearDisplay();

  for(int16_t i=0; i<max(display.width(),display.height())/2; i+=2) {
    display.drawCircle(display.width()/2, display.height()/2, i, WHITE);
    display.display();
    delay(1);
  }

  delay(2000);
}

void testfillcircle(void) {
  display.clearDisplay();

  for(int16_t i=max(display.width(),display.height())/2; i>0; i-=3) {
    // The INVERSE color is used so circles alternate white/black
    display.fillCircle(display.width() / 2, display.height() / 2, i, INVERSE);
    display.display(); // Update screen with each newly-drawn circle
    delay(1);
  }

  delay(2000);
}

void testdrawroundrect(void) {
  display.clearDisplay();

  for(int16_t i=0; i<display.height()/2-2; i+=2) {
    display.drawRoundRect(i, i, display.width()-2*i, display.height()-2*i,
      display.height()/4, WHITE);
    display.display();
    delay(1);
  }

  delay(2000);
}

void testfillroundrect(void) {
  display.clearDisplay();

  for(int16_t i=0; i<display.height()/2-2; i+=2) {
    // The INVERSE color is used so round-rects alternate white/black
    display.fillRoundRect(i, i, display.width()-2*i, display.height()-2*i,
      display.height()/4, INVERSE);
    display.display();
    delay(1);
  }

  delay(2000);
}

void testdrawtriangle(void) {
  display.clearDisplay();

  for(int16_t i=0; i<max(display.width(),display.height())/2; i+=5) {
    display.drawTriangle(
      display.width()/2  , display.height()/2-i,
      display.width()/2-i, display.height()/2+i,
      display.width()/2+i, display.height()/2+i, WHITE);
    display.display();
    delay(1);
  }

  delay(2000);
}

void testfilltriangle(void) {
  display.clearDisplay();

  for(int16_t i=max(display.width(),display.height())/2; i>0; i-=5) {
    // The INVERSE color is used so triangles alternate white/black
    display.fillTriangle(
      display.width()/2  , display.height()/2-i,
      display.width()/2-i, display.height()/2+i,
      display.width()/2+i, display.height()/2+i, INVERSE);
    display.display();
    delay(1);
  }

  delay(2000);
}

void testdrawchar(void) {
  display.clearDisplay();

  display.setTextSize(1);      // Normal 1:1 pixel scale
  display.setTextColor(WHITE); // Draw white text
  display.setCursor(0, 0);     // Start at top-left corner
  display.cp437(true);         // Use full 256 char 'Code Page 437' font

  // Not all the characters will fit on the display. This is normal.
  // Library will draw what it can and the rest will be clipped.
  for(int16_t i=0; i<256; i++) {
    if(i == '\n') display.write(' ');
    else          display.write(i);
  }

  display.display();
  delay(2000);
}

void testdrawstyles(void) {
  display.clearDisplay();

  display.setTextSize(1);             // Normal 1:1 pixel scale
  display.setTextColor(WHITE);        // Draw white text
  display.setCursor(0,0);             // Start at top-left corner
  display.println(F("Hello, world!"));

  display.setTextColor(BLACK, WHITE); // Draw 'inverse' text
  display.println(3.141592);

  display.setTextSize(2);             // Draw 2X-scale text
  display.setTextColor(WHITE);
  display.print(F("0x")); display.println(0xDEADBEEF, HEX);

  display.display();
  delay(2000);
}

void testscrolltext(void) {
  display.clearDisplay();

  display.setTextSize(2); // Draw 2X-scale text
  display.setTextColor(WHITE);
  display.setCursor(10, 0);
  display.println(F("scroll"));
  display.display();      // Show initial text
  delay(100);

  // Scroll in various directions, pausing in-between:
  display.startscrollright(0x00, 0x0F);
  delay(2000);
  display.stopscroll();
  delay(1000);
  display.startscrollleft(0x00, 0x0F);
  delay(2000);
  display.stopscroll();
  delay(1000);
  display.startscrolldiagright(0x00, 0x07);
  delay(2000);
  display.startscrolldiagleft(0x00, 0x07);
  delay(2000);
  display.stopscroll();
  delay(1000);
}

void testdrawbitmap(void) {
  display.clearDisplay();

  display.drawBitmap(
    (display.width()  - LOGO_WIDTH ) / 2,
    (display.height() - LOGO_HEIGHT) / 2,
    logo_bmp, LOGO_WIDTH, LOGO_HEIGHT, 1);
  display.display();
  delay(1000);
}

#define XPOS   0 // Indexes into the 'icons' array in function below
#define YPOS   1
#define DELTAY 2

void testanimate(const uint8_t *bitmap, uint8_t w, uint8_t h) {
  int8_t f, icons[NUMFLAKES][3];

  // Initialize 'snowflake' positions
  for(f=0; f< NUMFLAKES; f++) {
    icons[f][XPOS]   = random(1 - LOGO_WIDTH, display.width());
    icons[f][YPOS]   = -LOGO_HEIGHT;
    icons[f][DELTAY] = random(1, 6);
    Serial.print(F("x: "));
    Serial.print(icons[f][XPOS], DEC);
    Serial.print(F(" y: "));
    Serial.print(icons[f][YPOS], DEC);
    Serial.print(F(" dy: "));
    Serial.println(icons[f][DELTAY], DEC);
  }

  for(;;) { // Loop forever...
    display.clearDisplay(); // Clear the display buffer

    // Draw each snowflake:
    for(f=0; f< NUMFLAKES; f++) {
      display.drawBitmap(icons[f][XPOS], icons[f][YPOS], bitmap, w, h, WHITE);
    }

    display.display(); // Show the display buffer on the screen
    delay(200);        // Pause for 1/10 second

    // Then update coordinates of each flake...
    for(f=0; f< NUMFLAKES; f++) {
      icons[f][YPOS] += icons[f][DELTAY];
      // If snowflake is off the bottom of the screen...
      if (icons[f][YPOS] >= display.height()) {
        // Reinitialize to a random position, just off the top
        icons[f][XPOS]   = random(1 - LOGO_WIDTH, display.width());
        icons[f][YPOS]   = -LOGO_HEIGHT;
        icons[f][DELTAY] = random(1, 6);
      }
    }
  }
}
If your OLED doesn’t have a RESET pin, you should set the OLED_RESET variable to -1 as shown below:
#define OLED_RESET -1 // Reset pin # (or -1 if sharing Arduino reset pin)
Upload the code to your Arduino board. Don’t forget to select the right board and COM port in the Tools menu.
You should get a series of different animations in the OLED as shown in the following short video.https://player.vimeo.com/video/337530217?color=ff9933&title=1&byline=0&portrait=0
If your OLED display is not showing anything:
- Check that the OLED display is properly wired to the Arduino
- Double-check the OLED display I2C address: with the OLED connected to the Arduino, Upload This Code and check the I2C address in the Serial Monitor
You should change the OLED address in the following line, if necessary. In our case, the address is 0x3C.
if(!display.begin(SSD1306_SWITCHCAPVCC, 0x3C)) { Write Text – OLED Display
The Adafruit library for the OLED display comes with several functions to write text. In this section, you’ll learn how to write and scroll text using the library functions.
“Hello, World!” OLED Display
The following sketch displays Hello, world! message in the OLED display.
/*********
  Rui Santos
  Complete project details at https://randomnerdtutorials.com
*********/

#include <Wire.h>
#include <Adafruit_GFX.h>
#include <Adafruit_SSD1306.h>

#define SCREEN_WIDTH 128 // OLED display width, in pixels
#define SCREEN_HEIGHT 64 // OLED display height, in pixels

// Declaration for an SSD1306 display connected to I2C (SDA, SCL pins)
Adafruit_SSD1306 display(SCREEN_WIDTH, SCREEN_HEIGHT, &Wire, -1);

void setup() {
  Serial.begin(115200);

  if(!display.begin(SSD1306_SWITCHCAPVCC, 0x3C)) { // Address 0x3D for 128x64
    Serial.println(F("SSD1306 allocation failed"));
    for(;;);
  }
  delay(2000);
  display.clearDisplay();

  display.setTextSize(1);
  display.setTextColor(WHITE);
  display.setCursor(0, 10);
  // Display static text
  display.println("Hello, world!");
  display.display();
}

void loop() {

}
After uploading the code, this is what you’ll get in your OLED:

Let’s take a quick look on how the code works.
Importing Libraries
First, you need to import the necessary libraries. The Wire library to use I2C and the Adafruit libraries to write to the display: Adafruit_GFX and Adafruit_SSD1306.
#include <Wire.h>
#include <Adafruit_GFX.h>
#include <Adafruit_SSD1306.h>
Initialize The OLED Display
Then, you define your OLED width and height. In this example, we’re using a 128×64 OLED display. If you’re using other sizes, you can change that in the SCREEN_WIDTH, and SCREEN_HEIGHT variables.
#define SCREEN_WIDTH 128 // OLED display width, in pixels
#define SCREEN_HEIGHT 64 // OLED display height, in pixels
Then, initialize a display object with the width and height defined earlier with I2C communication protocol (&Wire).
Adafruit_SSD1306 display(SCREEN_WIDTH, SCREEN_HEIGHT, &Wire, -1);The (-1) parameter means that your OLED display doesn’t have a RESET pin. If your OLED display does have a RESET pin, it should be connected to a GPIO. In that case, you should pass the GPIO number as a parameter.
In the setup(), initialize the Serial Monitor at a baud raute of 115200 for debugging purposes.
Serial.begin(115200);Initialize the OLED display with the begin() method as follows:
if(!display.begin(SSD1306_SWITCHCAPVCC, 0x3C)) {
  Serial.println("SSD1306 allocation failed");
  for(;;); // Don't proceed, loop forever
}
This snippet also prints a message on the Serial Monitor, in case we’re not able to connect to the display.
Serial.println("SSD1306 allocation failed");In case you’re using a different OLED display, you may need to change the OLED address. In our case, the address is 0x3C.
if(!display.begin(SSD1306_SWITCHCAPVCC, 0x3C)) { If this address doesn’t work, you can run an I2C scanner sketch to find your OLED address. You can Find The I2C Scanner Sketch Here.
After initializing the display, add a two second delay, so that the OLED has enough time to initialize before writing text:
delay(2000);Clear Display, Set Font Size, Color And Write Text
After initializing the display, clear the display buffer with the clearDisplay() method:
display.clearDisplay();Before writing text, you need to set the text size, color and where the text will be displayed in the OLED.
Set the font size using the setTextSize() method:
display.setTextSize(1); Set the font color with the setTextColor() method:
display.setTextColor(WHITE); WHITE sets white font and black background.
Define the position where the text starts using the setCursor(x,y) method. In this case, we’re setting the text to start at the (0,10) coordinates.
display.setCursor(0,10); Finally, you can send the text to the display using the println() method, as follows:
display.println("Hello, world!");Then, you need to call the display() method to actually display the text on the screen.
display.display();Scrolling Text
The Adafruit OLED library provides useful methods to easily scroll text.
- startscrollright(0x00, 0x0F): scroll text from left to right
- startscrollleft(0x00, 0x0F): scroll text from right to left
- startscrolldiagright(0x00, 0x07): scroll text from left bottom corner to right upper corner
- startscrolldiagleft(0x00, 0x07): scroll text from right bottom corner to left upper corner
The following sketch implements those methods.
/*********
  Rui Santos
  Complete project details at https://randomnerdtutorials.com
*********/

#include <Wire.h>
#include <Adafruit_GFX.h>
#include <Adafruit_SSD1306.h>

#define SCREEN_WIDTH 128 // OLED display width, in pixels
#define SCREEN_HEIGHT 64 // OLED display height, in pixels

// Declaration for an SSD1306 display connected to I2C (SDA, SCL pins)
Adafruit_SSD1306 display(SCREEN_WIDTH, SCREEN_HEIGHT, &Wire, -1);

void setup() {
  Serial.begin(115200);

  if(!display.begin(SSD1306_SWITCHCAPVCC, 0x3C)) { // Address 0x3D for 128x64
    Serial.println(F("SSD1306 allocation failed"));
    for(;;);
  }
  delay(2000);
  display.clearDisplay();

  display.setTextSize(1);
  display.setTextColor(WHITE);
  display.setCursor(0, 0);
  // Display static text
  display.println("Scrolling Hello");
  display.display();
  delay(100);

}

void loop() {
  // Scroll in various directions, pausing in-between:
  display.startscrollright(0x00, 0x0F);
  delay(2000);
  display.stopscroll();
  delay(1000);
  display.startscrollleft(0x00, 0x0F);
  delay(2000);
  display.stopscroll();
  delay(1000);
  display.startscrolldiagright(0x00, 0x07);
  delay(2000);
  display.startscrolldiagleft(0x00, 0x07);
  delay(2000);
  display.stopscroll();
  delay(1000);
}
Using Other Fonts – OLED Display
The Adafruit GFX library allows us to use some alternate fonts besides the built-in fonts. It allows you to chose between Serif, Sans, and Mono. Each font is available in bold, italic and in different sizes.
The sizes are set by the actual font. So, the setTextSize() method doesn’t work with these fonts. The fonts are available in 9, 12, 18 and 24 point sizes and also contain 7-bit characters (ASCII codes) (described as 7b in the font name).
You can chose from the next selection of fonts:
FreeMono12pt7b.h		FreeSansBoldOblique12pt7b.h
FreeMono18pt7b.h		FreeSansBoldOblique18pt7b.h
FreeMono24pt7b.h		FreeSansBoldOblique24pt7b.h
FreeMono9pt7b.h			FreeSansBoldOblique9pt7b.h
FreeMonoBold12pt7b.h		FreeSansOblique12pt7b.h
FreeMonoBold18pt7b.h		FreeSansOblique18pt7b.h
FreeMonoBold24pt7b.h		FreeSansOblique24pt7b.h
FreeMonoBold9pt7b.h		FreeSansOblique9pt7b.h
FreeMonoBoldOblique12pt7b.h	FreeSerif12pt7b.h
FreeMonoBoldOblique18pt7b.h	FreeSerif18pt7b.h
FreeMonoBoldOblique24pt7b.h	FreeSerif24pt7b.h
FreeMonoBoldOblique9pt7b.h	FreeSerif9pt7b.h
FreeMonoOblique12pt7b.h		FreeSerifBold12pt7b.h
FreeMonoOblique18pt7b.h		FreeSerifBold18pt7b.h
FreeMonoOblique24pt7b.h		FreeSerifBold24pt7b.h
FreeMonoOblique9pt7b.h		FreeSerifBold9pt7b.h
FreeSans12pt7b.h		FreeSerifBoldItalic12pt7b.h
FreeSans18pt7b.h		FreeSerifBoldItalic18pt7b.h
FreeSans24pt7b.h		FreeSerifBoldItalic24pt7b.h
FreeSans9pt7b.h			FreeSerifBoldItalic9pt7b.h
FreeSansBold12pt7b.h		FreeSerifItalic12pt7b.h
FreeSansBold18pt7b.h		FreeSerifItalic18pt7b.h
FreeSansBold24pt7b.h		FreeSerifItalic24pt7b.h
FreeSansBold9pt7b.h		FreeSerifItalic9pt7b.h
The fonts that work better with the OLED display are the 9 and 12 points size.
To use one of those fonts, first you need to include it in your sketch, for example:
#include <Fonts/FreeSerif12pt7b.h>Next, you just need to use the setFont() method and pass as argument, the specified font:
display.setFont(&FreeSerif12pt7b);After specifying the font, all methods to write text will use that font. To get back to use the original font, you just need to call the setFont() method with no arguments:
display.setFont();Upload the next sketch to your board:
/*********
  Rui Santos
  Complete project details at https://randomnerdtutorials.com
*********/

#include <Wire.h>
#include <Adafruit_GFX.h>
#include <Adafruit_SSD1306.h>
#include <Fonts/FreeSerif9pt7b.h>

#define SCREEN_WIDTH 128 // OLED display width, in pixels
#define SCREEN_HEIGHT 64 // OLED display height, in pixels

// Declaration for an SSD1306 display connected to I2C (SDA, SCL pins)
Adafruit_SSD1306 display(SCREEN_WIDTH, SCREEN_HEIGHT, &Wire, -1);

void setup() {
  Serial.begin(115200);

  if(!display.begin(SSD1306_SWITCHCAPVCC, 0x3C)) {
    Serial.println("SSD1306 allocation failed");
    for(;;);
  }
  delay(2000);

  display.setFont(&FreeSerif9pt7b);
  display.clearDisplay();
  display.setTextSize(1);
  display.setTextColor(WHITE);
  display.setCursor(0,20);
  display.println("Hello, world!");
  display.display();
  delay(2000);
}
void loop() {

}
Now, your display prints the “Hello, world!” message in FreeSerif font.

Draw Shapes In The OLED Display
The Adafruit OLED library provides useful methods to draw pixels, lines and shapes. Let’s take a quick look at those methods.
Draw A Pixel
To draw a pixel in the OLED display, you can use the drawPixel(x, y, color) method that accepts as arguments the x and y coordinates where the pixel appears, and color. For example:
display.drawPixel(64, 32, WHITE);Draw A Line

Use the drawLine(x1, y1, x2, y2, color) method to create a line. The (x1, y1) coordinates indicate the start of the line, and the (x2, y2) coordinates indicates where the line ends. For example:
display.drawLine(0, 0, 127, 20, WHITE);Draw A Rectangle

The drawRect(x, y, width, height, color) provides an easy way to draw a rectangle. The (x, y) coordinates indicate the top left corner of the rectangle. Then, you need to specify the width, height and color:
display.drawRect(10, 10, 50, 30, WHITE);You can use the fillRect(x, y, width, height, color) to draw a filled rectangle. This method accepts the same arguments as drawRect().

The library also provides methods to displays rectangles with round corners: drawRoundRect() and fillRoundRect(). These methods accepts the same arguments as previous methods plus the radius of the corner. For example:
display.drawRoundRect(10, 10, 30, 50, 2, WHITE);
Or a filled round rectangle:
display.fillRoundRect(10, 10, 30, 50, 2, WHITE);
Draw A Circle

To draw a circle use the drawCircle(x, y, radius, color) method. The (x,y) coordinates indicate the center of the circle. You should also pass the radius as an argument. For example:
display.drawCircle(64, 32, 10, WHITE);In the same way, to build a filled circle, use the fillCircle() method with the same arguments:
display.fillCircle(64, 32, 10, WHITE);
Draw A Triangle

Use the the drawTriangle(x1, y1, x2, y2, x3, y3, color) method to build a triangle. This method accepts as arguments the coordinates of each corner and the color.
display.drawTriangle(10, 10, 55, 20, 5, 40, WHITE);Use the fillTriangle() method to draw a filled triangle.
display.fillTriangle(10, 10, 55, 20, 5, 40, WHITE);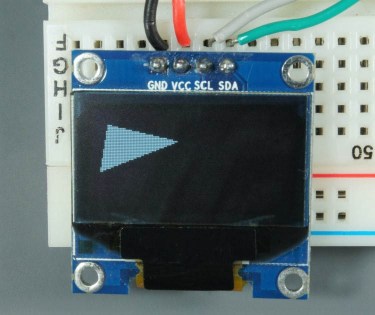
Invert
The library provides an additional method that you can use with shapes or text: the invertDisplay() method. Pass true as argument to invert the colors of the screen or false to get back to the original colors.
If you call the following command after defining the triangle:
display.invertDisplay(true);You’ll get an inverted triangle as follows:

Code – Draw Shapes
Upload the following sketch that implements each snippet of code we’ve covered previously and goes through all the shapes.
/*********
  Rui Santos
  Complete project details at https://randomnerdtutorials.com
*********/

#include <Wire.h>
#include <Adafruit_GFX.h>
#include <Adafruit_SSD1306.h>

#define SCREEN_WIDTH 128
#define SCREEN_HEIGHT 64

// Declaration for an SSD1306 display connected to I2C (SDA, SCL pins)
Adafruit_SSD1306 display(SCREEN_WIDTH, SCREEN_HEIGHT, &Wire, -1);

void setup() {
  Serial.begin(115200);

  if(!display.begin(SSD1306_SWITCHCAPVCC, 0x3C)) {
    Serial.println(F("SSD1306 allocation failed"));
    for(;;);
  }
  delay(2000); // Pause for 2 seconds

  // Clear the buffer
  display.clearDisplay();

  // Draw a single pixel in white
  display.drawPixel(64, 32, WHITE);
  display.display();
  delay(3000);

  // Draw line
  display.clearDisplay();
  display.drawLine(0, 0, 127, 20, WHITE);
  display.display();
  delay(3000);

  // Draw rectangle
  display.clearDisplay();
  display.drawRect(30, 10, 50, 30, WHITE);
  display.display();
  delay(3000);
  // Fill rectangle
  display.fillRect(30, 10, 50, 30, WHITE);
  display.display();
  delay(3000);

  // Draw round rectangle
  display.clearDisplay();
  display.drawRoundRect(10, 10, 30, 50, 2, WHITE);
  display.display();
  delay(3000);
  // Fill round rectangle
  display.clearDisplay();
  display.fillRoundRect(10, 10, 30, 50, 2, WHITE);
  display.display();
  delay(3000);

  // Draw circle
  display.clearDisplay();
  display.drawCircle(64, 32, 10, WHITE);
  display.display();
  delay(3000);
  // Fill circle
  display.fillCircle(64, 32, 10, WHITE);
  display.display();
  delay(3000);

  // Draw triangle
  display.clearDisplay();
  display.drawTriangle(10, 10, 55, 20, 5, 40, WHITE);
  display.display();
  delay(3000);
  // Fill triangle
  display.fillTriangle(10, 10, 55, 20, 5, 40, WHITE);
  display.display();
  delay(3000);

  // Invert and restore display, pausing in-between
  display.invertDisplay(true);
  delay(3000);
  display.invertDisplay(false);
  delay(3000);
}

void loop() {

}
Display Bitmap Images In The OLED
You can display 128×64 bitmap monocolor images on the OLED display.
First, use an imaging program to resize a photo or picture and save it as monochrome bitmap. If you’re on a Windows PC, you can use Paint.

Then, use a Image to C Array converter to convert the image into an array. I’ve used LCD Image Converter.
Run the program and start with a new image. Go to Image > Import and select the bitmap image you’ve created earlier.

Go to Options > Conversion and in the Prepare tab, select the following options:
- Type: Monochrome, Threshold Dither
- Main Scan Direction: Top to Bottom
- Line Scan Direction: Forward

Go to the Image tab and select the following options:
- Split to rows
- Block Size: 8 bit
- Byte Order: Little-Endian

Then, click OK. Finally, in the main menu, go to File > Convert. A new file with .c extension should be saved. That file contains the C array for the image. Open that file with a text editor, and copy the array.
In our case, this is the array that we get:
static const uint8_t image_data_Saraarray[1024] = {
    0xff, 0xff, 0xff, 0xff, 0xff, 0xff, 0xfe, 0x00, 0x00, 0x00, 0x1f, 0xff, 0xff, 0xff, 0xff, 0xff,
    0xff, 0xff, 0xff, 0xff, 0xff, 0xff, 0xf8, 0x00, 0x00, 0x00, 0x0f, 0xff, 0xff, 0xff, 0xff, 0xff,
    0xff, 0xff, 0xff, 0xff, 0xff, 0xff, 0xf8, 0x00, 0x00, 0x00, 0x07, 0xff, 0xff, 0xff, 0xff, 0xff,
    0xff, 0xff, 0xff, 0xff, 0xff, 0xff, 0xf0, 0x00, 0x00, 0x00, 0x07, 0xff, 0xff, 0xff, 0xff, 0xff,
    0xff, 0xff, 0xff, 0xff, 0xff, 0xff, 0xe0, 0x00, 0x00, 0x00, 0x03, 0xff, 0xff, 0xff, 0xff, 0xff,
    0xff, 0xff, 0xff, 0xff, 0xff, 0xff, 0xc0, 0x00, 0x00, 0x00, 0x01, 0xff, 0xff, 0xff, 0xff, 0xff,
    0xff, 0xff, 0xff, 0xff, 0xff, 0xff, 0x80, 0x00, 0x00, 0x00, 0x01, 0xff, 0xff, 0xff, 0xff, 0xff,
    0xff, 0xff, 0xff, 0xff, 0xff, 0xff, 0x80, 0x00, 0x00, 0x00, 0x00, 0xff, 0xff, 0xff, 0xff, 0xff,
    0xff, 0xff, 0xff, 0xff, 0xff, 0xff, 0x00, 0x00, 0x00, 0x00, 0x00, 0x7f, 0xff, 0xff, 0xff, 0xff,
    0xff, 0xff, 0xff, 0xff, 0xff, 0xfe, 0x00, 0x00, 0x00, 0x00, 0x00, 0x3f, 0xff, 0xff, 0xff, 0xff,
    0xff, 0xff, 0xff, 0xff, 0xff, 0xfc, 0x00, 0x00, 0x00, 0x00, 0x00, 0x3f, 0xff, 0xff, 0xff, 0xff,
    0xff, 0xff, 0xff, 0xff, 0xff, 0xfc, 0x00, 0x00, 0x00, 0x00, 0x00, 0x1f, 0xff, 0xff, 0xff, 0xff,
    0xff, 0xff, 0xff, 0xff, 0xff, 0xfc, 0x00, 0x00, 0x00, 0x00, 0x00, 0x1f, 0xff, 0xff, 0xff, 0xff,
    0xff, 0xff, 0xff, 0xff, 0xff, 0xfc, 0x00, 0x00, 0x00, 0x0a, 0x00, 0x1f, 0xff, 0xff, 0xff, 0xff,
    0xff, 0xff, 0xff, 0xff, 0xff, 0xfc, 0x00, 0x00, 0x14, 0x9e, 0x00, 0x1f, 0xff, 0xff, 0xff, 0xff,
    0xff, 0xff, 0xff, 0xff, 0xff, 0xfc, 0x00, 0x00, 0x36, 0x3f, 0x00, 0x1f, 0xff, 0xff, 0xff, 0xff,
    0xff, 0xff, 0xff, 0xff, 0xff, 0xfc, 0x00, 0x00, 0x6d, 0xff, 0x00, 0x1f, 0xff, 0xff, 0xff, 0xff,
    0xff, 0xff, 0xff, 0xff, 0xff, 0xfc, 0x00, 0x00, 0xfb, 0xff, 0x80, 0x1f, 0xff, 0xff, 0xff, 0xff,
    0xff, 0xff, 0xff, 0xff, 0xff, 0xfc, 0x00, 0x03, 0xd7, 0xff, 0x80, 0x0f, 0xff, 0xff, 0xff, 0xff,
    0xff, 0xff, 0xff, 0xff, 0xff, 0xf8, 0x00, 0x07, 0xef, 0xff, 0x80, 0x07, 0xff, 0xff, 0xff, 0xff,
    0xff, 0xff, 0xff, 0xff, 0xff, 0xf8, 0x00, 0x0f, 0xdf, 0xff, 0x90, 0x07, 0xff, 0xff, 0xff, 0xff,
    0xff, 0xff, 0xff, 0xff, 0xff, 0xf8, 0x00, 0x0f, 0xbf, 0xff, 0xd0, 0x07, 0xff, 0xff, 0xff, 0xff,
    0xff, 0xff, 0xff, 0xff, 0xff, 0xf0, 0x00, 0x1d, 0x7f, 0xff, 0xd0, 0x07, 0xff, 0xff, 0xff, 0xff,
    0xff, 0xff, 0xff, 0xff, 0xff, 0xf0, 0x01, 0x1b, 0xff, 0xff, 0xc0, 0x07, 0xff, 0xff, 0xff, 0xff,
    0xff, 0xff, 0xff, 0xff, 0xff, 0xf0, 0x02, 0xa7, 0xff, 0xff, 0xc0, 0x07, 0xff, 0xff, 0xff, 0xff,
    0xff, 0xff, 0xff, 0xff, 0xff, 0xe0, 0x00, 0x03, 0xff, 0xc0, 0x00, 0x07, 0xff, 0xff, 0xff, 0xff,
    0xff, 0xff, 0xff, 0xff, 0xff, 0xe0, 0x00, 0x00, 0xff, 0x80, 0x00, 0x0b, 0xff, 0xff, 0xff, 0xff,
    0xff, 0xff, 0xff, 0xff, 0xff, 0xc0, 0x03, 0xff, 0xff, 0xff, 0xf0, 0x0f, 0xff, 0xff, 0xff, 0xff,
    0xff, 0xff, 0xff, 0xff, 0xff, 0x80, 0x07, 0xff, 0xff, 0xff, 0xf0, 0x0f, 0xff, 0xff, 0xff, 0xff,
    0xff, 0xff, 0xff, 0xff, 0xff, 0x00, 0x0f, 0x07, 0xff, 0xf8, 0xf8, 0x03, 0xff, 0xff, 0xff, 0xff,
    0xff, 0xff, 0xff, 0xff, 0xff, 0x00, 0x0e, 0x01, 0xff, 0xc0, 0x38, 0x07, 0xff, 0xff, 0xff, 0xff,
    0xff, 0xff, 0xff, 0xff, 0xff, 0x00, 0x1c, 0x46, 0xff, 0xb1, 0x18, 0x07, 0xff, 0xff, 0xff, 0xff,
    0xff, 0xff, 0xff, 0xff, 0xfe, 0x00, 0x3f, 0x97, 0xff, 0xc0, 0x7a, 0x07, 0xff, 0xff, 0xff, 0xff,
    0xff, 0xff, 0xff, 0xff, 0xfe, 0x00, 0x3f, 0xff, 0xff, 0xff, 0xfe, 0x03, 0xff, 0xff, 0xff, 0xff,
    0xff, 0xff, 0xff, 0xff, 0xfe, 0x00, 0x3f, 0xff, 0xff, 0xff, 0xfe, 0x03, 0xff, 0xff, 0xff, 0xff,
    0xff, 0xff, 0xff, 0xff, 0xfe, 0x01, 0x3f, 0xff, 0xff, 0xff, 0xfe, 0x01, 0xff, 0xff, 0xff, 0xff,
    0xff, 0xff, 0xff, 0xff, 0xfe, 0x01, 0xbf, 0xff, 0xff, 0xff, 0xfe, 0x81, 0xff, 0xff, 0xff, 0xff,
    0xff, 0xff, 0xff, 0xff, 0xfc, 0x00, 0xbf, 0xff, 0xff, 0xff, 0xfc, 0x81, 0xff, 0xff, 0xff, 0xff,
    0xff, 0xff, 0xff, 0xff, 0xfc, 0x00, 0xff, 0xff, 0xfe, 0xff, 0xfd, 0x83, 0xff, 0xff, 0xff, 0xff,
    0xff, 0xff, 0xff, 0xff, 0xf8, 0x00, 0xbf, 0xff, 0xfe, 0xff, 0xfd, 0x01, 0xff, 0xff, 0xff, 0xff,
    0xff, 0xff, 0xff, 0xff, 0xf8, 0x00, 0x7f, 0xff, 0xff, 0xff, 0xff, 0x01, 0xff, 0xff, 0xff, 0xff,
    0xff, 0xff, 0xff, 0xff, 0xf0, 0x00, 0x7f, 0xff, 0xff, 0xff, 0xfb, 0x03, 0xff, 0xff, 0xff, 0xff,
    0xff, 0xff, 0xff, 0xff, 0xe0, 0x00, 0x3f, 0xff, 0xdc, 0xff, 0xfa, 0x03, 0xff, 0xff, 0xff, 0xff,
    0xff, 0xff, 0xff, 0xff, 0xd8, 0x00, 0x1f, 0xff, 0xff, 0xff, 0xf8, 0x03, 0xff, 0xff, 0xff, 0xff,
    0xff, 0xff, 0xff, 0xff, 0xd0, 0x00, 0x1f, 0xff, 0xff, 0xff, 0xf8, 0x01, 0xff, 0xff, 0xff, 0xff,
    0xff, 0xff, 0xff, 0xff, 0x90, 0x00, 0x1f, 0xff, 0xff, 0xff, 0xf8, 0x02, 0xff, 0xff, 0xff, 0xff,
    0xff, 0xff, 0xff, 0xff, 0xb0, 0x00, 0x0f, 0xf5, 0xff, 0xd7, 0xf8, 0x01, 0xff, 0xff, 0xff, 0xff,
    0xff, 0xff, 0xff, 0xff, 0xb0, 0x00, 0x0f, 0xff, 0xff, 0xff, 0xf8, 0x00, 0x5f, 0xff, 0xff, 0xff,
    0xff, 0xff, 0xff, 0xff, 0xa0, 0x00, 0x0f, 0xfb, 0xff, 0xff, 0xf0, 0x00, 0x3f, 0xff, 0xff, 0xff,
    0xff, 0xff, 0xff, 0xff, 0x80, 0x00, 0x0f, 0xfd, 0xff, 0xdf, 0xf0, 0x00, 0x3f, 0xff, 0xff, 0xff,
    0xff, 0xff, 0xff, 0xff, 0x80, 0x00, 0x07, 0xff, 0xff, 0xbf, 0xf0, 0x00, 0x0f, 0xff, 0xff, 0xff,
    0xff, 0xff, 0xff, 0xff, 0x80, 0x00, 0x07, 0xff, 0xff, 0xff, 0xe0, 0x00, 0x87, 0xff, 0xff, 0xff,
    0xff, 0xff, 0xff, 0xff, 0x80, 0x00, 0x03, 0xff, 0xff, 0xff, 0xc0, 0x00, 0x43, 0xff, 0xff, 0xff,
    0xff, 0xff, 0xff, 0xff, 0x60, 0x00, 0x01, 0xff, 0xff, 0xff, 0xc0, 0x00, 0x73, 0xff, 0xff, 0xff,
    0xff, 0xff, 0xff, 0xfe, 0xe0, 0x00, 0x00, 0xff, 0xff, 0xff, 0x80, 0x00, 0x7b, 0xff, 0xff, 0xff,
    0xff, 0xff, 0xff, 0xfd, 0xe0, 0x00, 0x00, 0x7f, 0xff, 0xfe, 0x00, 0x00, 0x33, 0xff, 0xff, 0xff,
    0xff, 0xff, 0xff, 0xfd, 0xe0, 0x00, 0x00, 0x3f, 0xff, 0xf8, 0x00, 0x00, 0x27, 0xff, 0xff, 0xff,
    0xff, 0xff, 0xff, 0xff, 0xe0, 0x00, 0x00, 0x0f, 0xff, 0xf0, 0x00, 0x00, 0x0f, 0xff, 0xff, 0xff,
    0xff, 0xff, 0xff, 0xff, 0x60, 0x00, 0x00, 0x67, 0xff, 0xe0, 0x00, 0x00, 0x1b, 0xff, 0xff, 0xff,
    0xff, 0xff, 0xff, 0xfd, 0x40, 0x00, 0x00, 0xf3, 0xff, 0xc4, 0x00, 0x00, 0x0b, 0xff, 0xff, 0xff,
    0xff, 0xff, 0xff, 0xfe, 0x80, 0x00, 0x00, 0xfc, 0xff, 0x8c, 0x00, 0x00, 0x03, 0xff, 0xff, 0xff,
    0xff, 0xff, 0xff, 0xfe, 0x00, 0x00, 0x00, 0x7f, 0x3c, 0x3c, 0x00, 0x00, 0x07, 0xff, 0xff, 0xff,
    0xff, 0xff, 0xff, 0xff, 0x00, 0x00, 0x00, 0x3f, 0xc0, 0x7c, 0x00, 0x00, 0x03, 0xff, 0xff, 0xff,
    0xff, 0xff, 0xff, 0xff, 0x00, 0x00, 0x00, 0x1f, 0xff, 0xfc, 0x00, 0x00, 0x03, 0xff, 0xff, 0xff
};
Copy your array to the sketch. Then, to display the array, use the drawBitmap() method that accepts the following arguments (x, y, image array, image width, image height, rotation). The (x, y) coordinates define where the image starts to be displayed.
Copy the code below to display your bitmap image in the OLED.
/*********
  Rui Santos
  Complete project details at https://randomnerdtutorials.com
*********/

#include <Wire.h>
#include <Adafruit_GFX.h>
#include <Adafruit_SSD1306.h>

#define SCREEN_WIDTH 128
#define SCREEN_HEIGHT 64

Adafruit_SSD1306 display(SCREEN_WIDTH, SCREEN_HEIGHT, &Wire, -1);

static const unsigned char PROGMEM image_data_Saraarray[] = {
    0xff, 0xff, 0xff, 0xff, 0xff, 0xff, 0xfe, 0x00, 0x00, 0x00, 0x1f, 0xff, 0xff, 0xff, 0xff, 0xff,
    0xff, 0xff, 0xff, 0xff, 0xff, 0xff, 0xf8, 0x00, 0x00, 0x00, 0x0f, 0xff, 0xff, 0xff, 0xff, 0xff,
    0xff, 0xff, 0xff, 0xff, 0xff, 0xff, 0xf8, 0x00, 0x00, 0x00, 0x07, 0xff, 0xff, 0xff, 0xff, 0xff,
    0xff, 0xff, 0xff, 0xff, 0xff, 0xff, 0xf0, 0x00, 0x00, 0x00, 0x07, 0xff, 0xff, 0xff, 0xff, 0xff,
    0xff, 0xff, 0xff, 0xff, 0xff, 0xff, 0xe0, 0x00, 0x00, 0x00, 0x03, 0xff, 0xff, 0xff, 0xff, 0xff,
    0xff, 0xff, 0xff, 0xff, 0xff, 0xff, 0xc0, 0x00, 0x00, 0x00, 0x01, 0xff, 0xff, 0xff, 0xff, 0xff,
    0xff, 0xff, 0xff, 0xff, 0xff, 0xff, 0x80, 0x00, 0x00, 0x00, 0x01, 0xff, 0xff, 0xff, 0xff, 0xff,
    0xff, 0xff, 0xff, 0xff, 0xff, 0xff, 0x80, 0x00, 0x00, 0x00, 0x00, 0xff, 0xff, 0xff, 0xff, 0xff,
    0xff, 0xff, 0xff, 0xff, 0xff, 0xff, 0x00, 0x00, 0x00, 0x00, 0x00, 0x7f, 0xff, 0xff, 0xff, 0xff,
    0xff, 0xff, 0xff, 0xff, 0xff, 0xfe, 0x00, 0x00, 0x00, 0x00, 0x00, 0x3f, 0xff, 0xff, 0xff, 0xff,
    0xff, 0xff, 0xff, 0xff, 0xff, 0xfc, 0x00, 0x00, 0x00, 0x00, 0x00, 0x3f, 0xff, 0xff, 0xff, 0xff,
    0xff, 0xff, 0xff, 0xff, 0xff, 0xfc, 0x00, 0x00, 0x00, 0x00, 0x00, 0x1f, 0xff, 0xff, 0xff, 0xff,
    0xff, 0xff, 0xff, 0xff, 0xff, 0xfc, 0x00, 0x00, 0x00, 0x00, 0x00, 0x1f, 0xff, 0xff, 0xff, 0xff,
    0xff, 0xff, 0xff, 0xff, 0xff, 0xfc, 0x00, 0x00, 0x00, 0x0a, 0x00, 0x1f, 0xff, 0xff, 0xff, 0xff,
    0xff, 0xff, 0xff, 0xff, 0xff, 0xfc, 0x00, 0x00, 0x14, 0x9e, 0x00, 0x1f, 0xff, 0xff, 0xff, 0xff,
    0xff, 0xff, 0xff, 0xff, 0xff, 0xfc, 0x00, 0x00, 0x36, 0x3f, 0x00, 0x1f, 0xff, 0xff, 0xff, 0xff,
    0xff, 0xff, 0xff, 0xff, 0xff, 0xfc, 0x00, 0x00, 0x6d, 0xff, 0x00, 0x1f, 0xff, 0xff, 0xff, 0xff,
    0xff, 0xff, 0xff, 0xff, 0xff, 0xfc, 0x00, 0x00, 0xfb, 0xff, 0x80, 0x1f, 0xff, 0xff, 0xff, 0xff,
    0xff, 0xff, 0xff, 0xff, 0xff, 0xfc, 0x00, 0x03, 0xd7, 0xff, 0x80, 0x0f, 0xff, 0xff, 0xff, 0xff,
    0xff, 0xff, 0xff, 0xff, 0xff, 0xf8, 0x00, 0x07, 0xef, 0xff, 0x80, 0x07, 0xff, 0xff, 0xff, 0xff,
    0xff, 0xff, 0xff, 0xff, 0xff, 0xf8, 0x00, 0x0f, 0xdf, 0xff, 0x90, 0x07, 0xff, 0xff, 0xff, 0xff,
    0xff, 0xff, 0xff, 0xff, 0xff, 0xf8, 0x00, 0x0f, 0xbf, 0xff, 0xd0, 0x07, 0xff, 0xff, 0xff, 0xff,
    0xff, 0xff, 0xff, 0xff, 0xff, 0xf0, 0x00, 0x1d, 0x7f, 0xff, 0xd0, 0x07, 0xff, 0xff, 0xff, 0xff,
    0xff, 0xff, 0xff, 0xff, 0xff, 0xf0, 0x01, 0x1b, 0xff, 0xff, 0xc0, 0x07, 0xff, 0xff, 0xff, 0xff,
    0xff, 0xff, 0xff, 0xff, 0xff, 0xf0, 0x02, 0xa7, 0xff, 0xff, 0xc0, 0x07, 0xff, 0xff, 0xff, 0xff,
    0xff, 0xff, 0xff, 0xff, 0xff, 0xe0, 0x00, 0x03, 0xff, 0xc0, 0x00, 0x07, 0xff, 0xff, 0xff, 0xff,
    0xff, 0xff, 0xff, 0xff, 0xff, 0xe0, 0x00, 0x00, 0xff, 0x80, 0x00, 0x0b, 0xff, 0xff, 0xff, 0xff,
    0xff, 0xff, 0xff, 0xff, 0xff, 0xc0, 0x03, 0xff, 0xff, 0xff, 0xf0, 0x0f, 0xff, 0xff, 0xff, 0xff,
    0xff, 0xff, 0xff, 0xff, 0xff, 0x80, 0x07, 0xff, 0xff, 0xff, 0xf0, 0x0f, 0xff, 0xff, 0xff, 0xff,
    0xff, 0xff, 0xff, 0xff, 0xff, 0x00, 0x0f, 0x07, 0xff, 0xf8, 0xf8, 0x03, 0xff, 0xff, 0xff, 0xff,
    0xff, 0xff, 0xff, 0xff, 0xff, 0x00, 0x0e, 0x01, 0xff, 0xc0, 0x38, 0x07, 0xff, 0xff, 0xff, 0xff,
    0xff, 0xff, 0xff, 0xff, 0xff, 0x00, 0x1c, 0x46, 0xff, 0xb1, 0x18, 0x07, 0xff, 0xff, 0xff, 0xff,
    0xff, 0xff, 0xff, 0xff, 0xfe, 0x00, 0x3f, 0x97, 0xff, 0xc0, 0x7a, 0x07, 0xff, 0xff, 0xff, 0xff,
    0xff, 0xff, 0xff, 0xff, 0xfe, 0x00, 0x3f, 0xff, 0xff, 0xff, 0xfe, 0x03, 0xff, 0xff, 0xff, 0xff,
    0xff, 0xff, 0xff, 0xff, 0xfe, 0x00, 0x3f, 0xff, 0xff, 0xff, 0xfe, 0x03, 0xff, 0xff, 0xff, 0xff,
    0xff, 0xff, 0xff, 0xff, 0xfe, 0x01, 0x3f, 0xff, 0xff, 0xff, 0xfe, 0x01, 0xff, 0xff, 0xff, 0xff,
    0xff, 0xff, 0xff, 0xff, 0xfe, 0x01, 0xbf, 0xff, 0xff, 0xff, 0xfe, 0x81, 0xff, 0xff, 0xff, 0xff,
    0xff, 0xff, 0xff, 0xff, 0xfc, 0x00, 0xbf, 0xff, 0xff, 0xff, 0xfc, 0x81, 0xff, 0xff, 0xff, 0xff,
    0xff, 0xff, 0xff, 0xff, 0xfc, 0x00, 0xff, 0xff, 0xfe, 0xff, 0xfd, 0x83, 0xff, 0xff, 0xff, 0xff,
    0xff, 0xff, 0xff, 0xff, 0xf8, 0x00, 0xbf, 0xff, 0xfe, 0xff, 0xfd, 0x01, 0xff, 0xff, 0xff, 0xff,
    0xff, 0xff, 0xff, 0xff, 0xf8, 0x00, 0x7f, 0xff, 0xff, 0xff, 0xff, 0x01, 0xff, 0xff, 0xff, 0xff,
    0xff, 0xff, 0xff, 0xff, 0xf0, 0x00, 0x7f, 0xff, 0xff, 0xff, 0xfb, 0x03, 0xff, 0xff, 0xff, 0xff,
    0xff, 0xff, 0xff, 0xff, 0xe0, 0x00, 0x3f, 0xff, 0xdc, 0xff, 0xfa, 0x03, 0xff, 0xff, 0xff, 0xff,
    0xff, 0xff, 0xff, 0xff, 0xd8, 0x00, 0x1f, 0xff, 0xff, 0xff, 0xf8, 0x03, 0xff, 0xff, 0xff, 0xff,
    0xff, 0xff, 0xff, 0xff, 0xd0, 0x00, 0x1f, 0xff, 0xff, 0xff, 0xf8, 0x01, 0xff, 0xff, 0xff, 0xff,
    0xff, 0xff, 0xff, 0xff, 0x90, 0x00, 0x1f, 0xff, 0xff, 0xff, 0xf8, 0x02, 0xff, 0xff, 0xff, 0xff,
    0xff, 0xff, 0xff, 0xff, 0xb0, 0x00, 0x0f, 0xf5, 0xff, 0xd7, 0xf8, 0x01, 0xff, 0xff, 0xff, 0xff,
    0xff, 0xff, 0xff, 0xff, 0xb0, 0x00, 0x0f, 0xff, 0xff, 0xff, 0xf8, 0x00, 0x5f, 0xff, 0xff, 0xff,
    0xff, 0xff, 0xff, 0xff, 0xa0, 0x00, 0x0f, 0xfb, 0xff, 0xff, 0xf0, 0x00, 0x3f, 0xff, 0xff, 0xff,
    0xff, 0xff, 0xff, 0xff, 0x80, 0x00, 0x0f, 0xfd, 0xff, 0xdf, 0xf0, 0x00, 0x3f, 0xff, 0xff, 0xff,
    0xff, 0xff, 0xff, 0xff, 0x80, 0x00, 0x07, 0xff, 0xff, 0xbf, 0xf0, 0x00, 0x0f, 0xff, 0xff, 0xff,
    0xff, 0xff, 0xff, 0xff, 0x80, 0x00, 0x07, 0xff, 0xff, 0xff, 0xe0, 0x00, 0x87, 0xff, 0xff, 0xff,
    0xff, 0xff, 0xff, 0xff, 0x80, 0x00, 0x03, 0xff, 0xff, 0xff, 0xc0, 0x00, 0x43, 0xff, 0xff, 0xff,
    0xff, 0xff, 0xff, 0xff, 0x60, 0x00, 0x01, 0xff, 0xff, 0xff, 0xc0, 0x00, 0x73, 0xff, 0xff, 0xff,
    0xff, 0xff, 0xff, 0xfe, 0xe0, 0x00, 0x00, 0xff, 0xff, 0xff, 0x80, 0x00, 0x7b, 0xff, 0xff, 0xff,
    0xff, 0xff, 0xff, 0xfd, 0xe0, 0x00, 0x00, 0x7f, 0xff, 0xfe, 0x00, 0x00, 0x33, 0xff, 0xff, 0xff,
    0xff, 0xff, 0xff, 0xfd, 0xe0, 0x00, 0x00, 0x3f, 0xff, 0xf8, 0x00, 0x00, 0x27, 0xff, 0xff, 0xff,
    0xff, 0xff, 0xff, 0xff, 0xe0, 0x00, 0x00, 0x0f, 0xff, 0xf0, 0x00, 0x00, 0x0f, 0xff, 0xff, 0xff,
    0xff, 0xff, 0xff, 0xff, 0x60, 0x00, 0x00, 0x67, 0xff, 0xe0, 0x00, 0x00, 0x1b, 0xff, 0xff, 0xff,
    0xff, 0xff, 0xff, 0xfd, 0x40, 0x00, 0x00, 0xf3, 0xff, 0xc4, 0x00, 0x00, 0x0b, 0xff, 0xff, 0xff,
    0xff, 0xff, 0xff, 0xfe, 0x80, 0x00, 0x00, 0xfc, 0xff, 0x8c, 0x00, 0x00, 0x03, 0xff, 0xff, 0xff,
    0xff, 0xff, 0xff, 0xfe, 0x00, 0x00, 0x00, 0x7f, 0x3c, 0x3c, 0x00, 0x00, 0x07, 0xff, 0xff, 0xff,
    0xff, 0xff, 0xff, 0xff, 0x00, 0x00, 0x00, 0x3f, 0xc0, 0x7c, 0x00, 0x00, 0x03, 0xff, 0xff, 0xff,
    0xff, 0xff, 0xff, 0xff, 0x00, 0x00, 0x00, 0x1f, 0xff, 0xfc, 0x00, 0x00, 0x03, 0xff, 0xff, 0xff
};

void setup() {
  Serial.begin(115200);

  if(!display.begin(SSD1306_SWITCHCAPVCC, 0x3C)) {
    Serial.println(F("SSD1306 allocation failed"));
    for(;;);
  }
  delay(2000); // Pause for 2 seconds

  // Clear the buffer.
  display.clearDisplay();

  // Draw bitmap on the screen
  display.drawBitmap(0, 0, image_data_Saraarray, 128, 64, 1);
  display.display();
}

void loop() {

}
After uploading the code, this is what we get on the display.

Display Temperature And Humidity In The OLED Display With Arduino
In this section we’ll build a project that displays temperature and humidity readings on the OLED display. We’ll get temperature and humidity using the DHT11 Temperature And Humidity Sensor.
Parts Required
To complete this project you need the following components:
- 0.96 Inch OLED Display
- Arduino – Read Best Arduino Starter Kits
- DHT11 or DHT22 temperature and humidity sensor
- Breadboard
- 4.7k Ohm Resistor (or 10k Ohm Resistor)
- Jumper Wires
You can use the preceding links or go directly to MakerAdvisor.Com/Tools to find all the parts for your projects at the best price!

Schematic
Assemble the circuit by following the next schematic diagram.

Note: if you’re using a module with a DHT sensor, it normally comes with only three pins. The pins should be labeled so that you know how to wire them. Additionally, many of these modules already come with an internal pull up resistor, so you don’t need to add one to the circuit.
Installing Libraries
Before proceeding, make sure you have installed the“Adafruit_GFX.H” and the “Adafruit_SSD1306.H” libraries to control the OLED display.
For this project you also need two aditional libraries to read from the DHT sensor: the DHTlibrary and the Adafruit_Sensor library. Follow the next steps to install those libraries
1. Open your Arduino IDE and go to Sketch > Include Library > Manage Libraries. The Library Manager should open.
2. Search for “DHT” on the Search box and install the DHT library from Adafruit.

3. After installing the DHT library from Adafruit, type “Adafruit Unified Sensor” in the search box. Scroll all the way down to find the library and install it.

4. Restart your Arduino IDE.
Code
After installing all the necessary libraries, you can upload the following code.
/*********
  Rui Santos
  Complete project details at https://randomnerdtutorials.com
*********/

#include <Wire.h>
#include <Adafruit_GFX.h>
#include <Adafruit_SSD1306.h>
#include <Adafruit_Sensor.h>
#include <DHT.h>

#define SCREEN_WIDTH 128 // OLED display width, in pixels
#define SCREEN_HEIGHT 64 // OLED display height, in pixels

// Declaration for an SSD1306 display connected to I2C (SDA, SCL pins)
Adafruit_SSD1306 display(SCREEN_WIDTH, SCREEN_HEIGHT, &Wire, -1);

#define DHTPIN 2     // Digital pin connected to the DHT sensor

// Uncomment the type of sensor in use:
#define DHTTYPE    DHT11     // DHT 11
//#define DHTTYPE    DHT22     // DHT 22 (AM2302)
//#define DHTTYPE    DHT21     // DHT 21 (AM2301)

DHT dht(DHTPIN, DHTTYPE);

void setup() {
  Serial.begin(115200);

  dht.begin();

  if(!display.begin(SSD1306_SWITCHCAPVCC, 0x3C)) {
    Serial.println(F("SSD1306 allocation failed"));
    for(;;);
  }
  delay(2000);
  display.clearDisplay();
  display.setTextColor(WHITE);
}

void loop() {
  delay(5000);

  //read temperature and humidity
  float t = dht.readTemperature();
  float h = dht.readHumidity();
  if (isnan(h) || isnan(t)) {
    Serial.println("Failed to read from DHT sensor!");
  }

  //clear display
  display.clearDisplay();

  // display temperature
  display.setTextSize(1);
  display.setCursor(0,0);
  display.print("Temperature: ");
  display.setTextSize(2);
  display.setCursor(0,10);
  display.print(t);
  display.print(" ");
  display.setTextSize(1);
  display.cp437(true);
  display.write(167);
  display.setTextSize(2);
  display.print("C");

  // display humidity
  display.setTextSize(1);
  display.setCursor(0, 35);
  display.print("Humidity: ");
  display.setTextSize(2);
  display.setCursor(0, 45);
  display.print(h);
  display.print(" %");

  display.display();
}
How The Code Works
Read this section if you want to learn how the code works. Otherwise, you can skip to the “Demonstration” section.
Importing Libraries
The code starts by including the necessary libraries. The Wire, Adafruit_GFX and Adafruit_SSD1306 are used to interface with the OLED display. The Adafruit_Sensor and the DHT libraries are used to interface with the DHT22 or DHT11 sensors.
#include <Wire.h>
#include <Adafruit_GFX.h>
#include <Adafruit_SSD1306.h>
#include <Adafruit_Sensor.h>
#include <DHT.h>
Create A Display Object
Then, define your OLED display dimensions. In this case, we’re using a 128×64 pixel display.
#define SCREEN_WIDTH 128 // OLED display width, in pixels
#define SCREEN_HEIGHT 64 // OLED display height, in pixels
Then, initialize a display object with the width and height defined earlier with I2C communication protocol (&Wire).
Adafruit_SSD1306 display(SCREEN_WIDTH, SCREEN_HEIGHT, &Wire, -1);The (-1) parameter means that your OLED display doesn’t have a RESET pin. If your OLED display does have a RESET pin, it should be connected to a GPIO. In that case, you should pass the GPIO number as a parameter.
Create A DHT Object
Then, define the DHT sensor type you’re using. If you’re using a DHT11 you don’t need to change anything on the code. If you’re using another sensor, just uncomment the sensor you’re using and comment the others.
#define DHTTYPE    DHT11     // DHT 11
//#define DHTTYPE    DHT22     // DHT 22 (AM2302)
//#define DHTTYPE    DHT21     // DHT 21 (AM2301)
Initialize a DHT sensor object with the pin and type defined earlier.
DHT dht(DHTPIN, DHTTYPE);Setup()
In the setup(), initialize the serial monitor for debugging purposes.
Serial.begin(115200);Initialize the DHT sensor:
dht.begin();Then, initialize the OLED display.
if(!display.begin(SSD1306_SWITCHCAPVCC, 0x3C)) { // Address 0x3D for 128x64
  Serial.println(F("SSD1306 allocation failed"));
  for(;;);
}
In this case, the address of the OLED display we’re using is 0x3C. If this address doesn’t work, you can run an I2C scanner sketch to find your OLED address. You can Find The I2C Scanner Sketch Here.
Add a delay to give time for the display to initialize, clear the display and set the text color to white:
delay(2000);
display.clearDisplay();
display.setTextColor(WHITE)
In the loop() is where we read the sensor and display the temperature and humidity on the display.
Get Temperature And Humidity Readings From DHT
The temperature and humidity are saved on the t and h variables, respectively. Reading temperature and humidity is as simple as using the readTemperature() and readHumidity() methods on the dht object.
float t = dht.readTemperature();
float h = dht.readHumidity();
In case we are not able to get the readings, display an error message:
if (isnan(h) || isnan(t)) {
  Serial.println("Failed to read from DHT sensor!");
}
Display Sensor Readings On The OLED Display
The following lines display the temperature on the OLED display.
  display.setTextSize(1);
  display.setCursor(0,0);
  display.print("Temperature: ");
  display.setTextSize(2);
  display.setCursor(0,10);
  display.print(t);
  display.print(" ");
  display.setTextSize(1);
  display.cp437(true);
  display.write(167);
  display.setTextSize(2);
  display.print("C");
We use the setTextSize() method to define the font size, the setCursor() sets where the text should start being displayed and the print() method is used to write something on the display.
To print the temperature and humidity you just need to pass their variables to the print() method as follows:
display.print(t);The “Temperature” label is displayed in size 1, and the actual reading is displayed in size 2.
To display the º symbol, we use the Code Page 437 font. For that, you need to set the cp437 to true as follows:
display.cp437(true);Then, use the write() method to display your chosen character. The º symbol corresponds to character 167.
display.write(167);A similar approach is used to display the humidity:
display.setTextSize(1);
display.setCursor(0, 35);
display.print("Humidity: ");
display.setTextSize(2);
display.setCursor(0, 45);
display.print(h);
display.print(" %");
Don’t forget that you need to call display.display() at the end, so that you can actually display something on the OLED.
display.display(); Demonstration
After wiring the circuit and uploading the code, the OLED display shows the temperature and humidity readings. The sensor readings are updated every five seconds.

Troubleshooting
If you get the “SSD1306 Allocation Failed” error or if the OLED is not displaying anything in the screen, it can be one of the following issues:
Wrong I2C Address
The I2C address for the OLED display we are using is 0x3C. However, yours may be different. So, make sure you check your display I2C address using an I2C Scanner Sketch.
SDA And SCL Not Connected Properly
Please make sure that you have the SDA and SCL pins of the OLED display wired correctly.